Showing posts with label Rancang Bangun. Show all posts
Friday, May 29, 2015
LAB 10 Backup and Restore Configuration

- TOPOLOGY
- TOPOLOGI
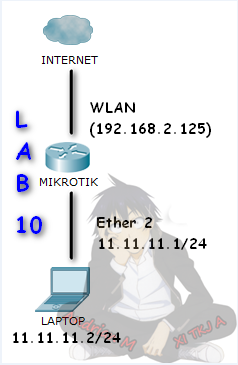
- TABEL ADDRESSING :
- TABEL ADDRESSING :

- THE PURPOSE OF THE WRITING :
- TUJUAN PENULISAN :
- To know how to backup and restore configuration using binary files without a password
- Untuk mengetahui cara backup dan restore konfigurasi menggunakan binary file tanpa password
- To know how to backup and restore configuration using the binary file with a password
- To know how to backup and restore configuration using the binary file with a password
- Untuk mengetahui cara backup dan restore konfigurasi menggunakan binary file dengan password
- To know how to backup and restore configuration using script files
- To know how to backup and restore configuration using script files
- Untuk mengetahui cara backup dan restore konfigurasi menggunakan script file
- BASIC CONCEPTS :
- KONSEP DASAR :
Backup, Membuat
cadangan file yang berisi sistem file untuk disimpan jika terjadi
kehancuran pada sistem, sehingga software yang sebelumnya sudah dibackup
dapat dikembalikan ke kondisi sebelum hancur/rusak. Dan Restore adalah Memperbaiki ulang sistem yang rusak dengan menggunakan media backup yang sudah disiapkan.
Friday, May 22, 2015
LAB 9 Connecting Internet With Routerboard

- TOPOLOGY
- TOPOLOGI
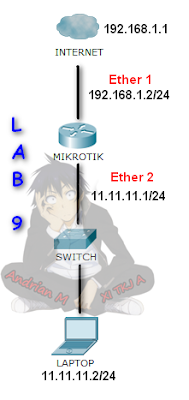
- TABEL ADDRESSING :
- TABEL ADDRESSING :

- THE PURPOSE OF THE WRITING :
- TUJUAN PENULISAN :
1. Untuk mengetahui pengertian dari NAT
2. To know how to configure routerboard thats can be connect to the internet
2. Untuk mengetahui cara konfigurasi routerboard supaya dapat connect ke internet
- BASIC CONCEPTS :
- KONSEP DASAR :
NAT (Network Address Translation) or network address interpretation is a
method to connect more than one computer to the Internet network using a
single IP address. Many use this method due to the limited availability
of IP addresses, the need for security (security), and the ease and
flexibility in network administration.
NAT is a protocol in a network system, NAT allows a network with an IP or internet protocol that is private or private IP that are not registered in the Internet network to access the Internet, this means that an IP address can access the Internet by using private IP or not using public IP, NAT is usually embedded in a router, NAT is also commonly used to combine or connect two different networks, and translate or not translate private IP or public IP address in the internal network into legal network that network so that it has the right to perform access the data in a network.
NAT (Network Address Translation) atau Penafsiran alamat jaringan adalah suatu metode untuk menghubungkan lebih dari satu komputer ke jaringan internet dengan menggunakan satu alamat IP. Banyaknya penggunaan metode ini disebabkan karena ketersediaan alamat IP yang terbatas, kebutuhan akan keamanan (security), dan kemudahan serta fleksibilitas dalam administrasi jaringan.
NAT merupakan salah satu protocol dalam suatu sistem jaringan, NAT memungkinkan suatu jaringan dengan IP atau internet protocol yang bersifat privat atau private IP yang sifatnya belum teregistrasi di jaringan internet untuk mengakses jalur internet, hal ini berarti suatu alamat IP dapat mengakses internet dengan menggunakan IP privat atau bukan menggunakan IP public, NAT biasanya dibenamkan dalam sebuah router, NAT juga sering digunakan untuk menggabungkan atau menghubungkan dua jaringan yang berbeda, dan mentranslate atau menterjemahkan IP privat atau bukan IP public dalam jaringan internal ke dalam jaringan yang legal network sehingga memiliki hak untuk melakukan akses data dalam sebuah jaringan.
NAT is a protocol in a network system, NAT allows a network with an IP or internet protocol that is private or private IP that are not registered in the Internet network to access the Internet, this means that an IP address can access the Internet by using private IP or not using public IP, NAT is usually embedded in a router, NAT is also commonly used to combine or connect two different networks, and translate or not translate private IP or public IP address in the internal network into legal network that network so that it has the right to perform access the data in a network.
NAT (Network Address Translation) atau Penafsiran alamat jaringan adalah suatu metode untuk menghubungkan lebih dari satu komputer ke jaringan internet dengan menggunakan satu alamat IP. Banyaknya penggunaan metode ini disebabkan karena ketersediaan alamat IP yang terbatas, kebutuhan akan keamanan (security), dan kemudahan serta fleksibilitas dalam administrasi jaringan.
NAT merupakan salah satu protocol dalam suatu sistem jaringan, NAT memungkinkan suatu jaringan dengan IP atau internet protocol yang bersifat privat atau private IP yang sifatnya belum teregistrasi di jaringan internet untuk mengakses jalur internet, hal ini berarti suatu alamat IP dapat mengakses internet dengan menggunakan IP privat atau bukan menggunakan IP public, NAT biasanya dibenamkan dalam sebuah router, NAT juga sering digunakan untuk menggabungkan atau menghubungkan dua jaringan yang berbeda, dan mentranslate atau menterjemahkan IP privat atau bukan IP public dalam jaringan internal ke dalam jaringan yang legal network sehingga memiliki hak untuk melakukan akses data dalam sebuah jaringan.
LAB 8 Configuration Interface
LAB 8 CONFIGURATION INTERFACE

- THE PURPOSE OF THE WRITING :
- TUJUAN PENULISAN :
1. To know what is the meaning of VLAN
1. Untuk mengetahui pengertian dari VLAN
1. Untuk mengetahui pengertian dari VLAN
2. To know how to configure IP address on the routerboard
2. Untuk mengetahui cara konfigurasi IP address di routerboard
2. Untuk mengetahui cara konfigurasi IP address di routerboard
3. To know how to change the interface name and giving a comment
3. Untuk mengetahui cara mengubah nama interface dan memberikan comment
3. Untuk mengetahui cara mengubah nama interface dan memberikan comment
4. To know how to disable and enable interface
4. Untuk mengetahui cara disable dan enable interface
5. To know how to create a VLAN and delete a VLAN
5. Untuk mengetahui cara membuat VLAN dan menghapus VLAN
6. To know how to make a routerboard as a switch
6. Untuk mengetahui cara menjadikan routerboard sebagai switch
- BASIC CONCEPTS :
- KONSEP DASAR :
VLAN is a network model that is not limited to a physical location such as a LAN, this has resulted in a network can be configured Virtual without having to comply with the physical location of equipment. The use of VLANs will make the network settings to be very flexible which can be made segments that depend on the organization or department, without depending on the location of the workstation.
VLAN merupakan suatu model jaringan yang tidak terbatas pada lokasi fisik seperti LAN , hal ini mengakibatkan suatu network dapat dikonfigurasi secara virtual tanpa harus menuruti lokasi fisik peralatan. Penggunaan VLAN akan membuat pengaturan jaringan menjadi sangat fleksibel dimana dapat dibuat segmen yang bergantung pada organisasi atau departemen, tanpa bergantung pada lokasi workstation.
- IP Address setting
- Mensetting IP Address
VLAN merupakan suatu model jaringan yang tidak terbatas pada lokasi fisik seperti LAN , hal ini mengakibatkan suatu network dapat dikonfigurasi secara virtual tanpa harus menuruti lokasi fisik peralatan. Penggunaan VLAN akan membuat pengaturan jaringan menjadi sangat fleksibel dimana dapat dibuat segmen yang bergantung pada organisasi atau departemen, tanpa bergantung pada lokasi workstation.
- CONFIGURATION :
- KONFIGURASI :
- IP Address setting
- Mensetting IP Address
1. The first, enter the IP address of ether1 on the routerboard.
1. Pertama, masukan IP address ether1 pada routerboard.

2. Try to do PING to your server/ISP. If successful it means your IP public can be used.
2. Coba lakukan PING ke server/ISP anda. Jika berhasil artinya IP public anda sudah dapat digunakan.

- Change the interface name and giving comment
- Mengubah nama interface dan memberikan comment
3. Now to see/check the interfaces that exist on the routerboard, typing interface print.
3. Sekarang untuk melihat/mengecek interface yang ada pada routerboard tersebut, ketikan interface print.

4. Then to change the interface name of the routerboard, typing a command like this, here the author change ether1 become public and ether2 become local.
4. Lalu untuk mengganti nama interface dari routerboard tersebut, ketikan perintah seperti di bawah ini, disini penulis mengubah ether1 menjadi public dan ether2 menjadi local.

5. And to add comment on each ethernet, typing a command like this, here the authors provide comment "ke internet" for ether1.
5. Dan untuk menambahkan comment dari tiap ethernet, ketikan perintah seperti di bawah ini, disini penulis memberikan comment "ke internet" untuk ether1.

6. Then to add a comment to ether 2, typing a command like this, here the authors provide comment "ke local" for ether2.
6. Lalu untuk menambahkan comment untuk ether 2, ketikan perintah seperti di bawah ini, disini penulis memberikan comment "ke local" untuk ether2.

- Disable & Enable
- Disable & Enable
7. To disable an existing ethernet on the routerboard, typing a command like this, but before disable, first check the number thats where the ethernet position on the flags.
7. Untuk mendisable ethernet yang ada pada routerboard tersebut, ketikan perintah seperti di bawah ini, namun sebelum mendisable, cek terlebih dahulu berada di flags berapa ethernet tersebut.

8. Then to enable, typing a command like this, but before enable, check the number thats where the ethernet position on the flags.
8. Lalu untuk melakukan enable, ketikan perintah seperti di bawah ini, namun sebelum melakukan enable, cek terlebih dahulu berada di flags berapa ethernet tersebut.

- Create a VLAN
- Membuat VLAN
9. To create a VLAN, typing a command like this, input the ether thats you want to create a VLAN, here the author makes two VLANs thats put it into ether2.
9. Untuk membuat VLAN, ketikan perintah seperti di bawah ini, masukan ether berapa yang ingin dibuat VLAN, disini penulis membuat 2 VLAN dengan memasukannya ke dalam ether2.

10. Then do enable to the ether3, ether4 and ether5 that has been disabled.
10. Lalu lakukan enable pada ether3, ether4, ether5 yang tadi telah disable.

11. And to remove a VLAN that has been create, typing a command like below, enter the name of VLAN thats you want to delete.
11. Dan untuk menghapus VLAN yang sudah dibuat, ketikan perintah seperti di bawah ini, masukan nama VLAN apa yang ingin anda hapus.

- Make a router as switch
- Membuat router menjadi switch
12. First, check the ethernet thats you want to make a switch, then typing the command as below, here the author makes ether3, ether4, ether5 as the master-port switch is on the ether2.
12. Pertama cek terlebih dahulu ethernet berapa yang ingin anda jadikan switch, setelah itu ketikan perintah seperti di bawah ini, disini penulis membuat ether3, ether4, ether5 sebagai switch yang master-portnya berada pada ether2.

Saturday, May 9, 2015
LAB 7 Management User and Services
LAB VII MANAGEMENT USER AND SERVICES

- THE PURPOSE OF THE WRITING :
- TUJUAN PENULISAN :
1. Untuk mengetahui cara mengubah nama identitas dari routerboard Mikrotik
2. To know how to management user in the Mikrotik routerboard
2. Untuk mengetahui cara manajemen user di routerboard Mikrotik
3. To know how to management services in the Mikrotik routerboard
3. Untuk mengetahui cara manajemen services di routerboard Mikrotik
- BASIC CONCEPTS :
- KONSEP DASAR :
User management is doing maintenance, checking, addition, subtraction, etc. And the specific purpose performed by an administrator to serve user / client.
Manajemen user adalah melakukan perawatan, pengecekan, penambahan, pengurangan dan lain-lain, untuk suatu tujuan tertentu yang dilakukan oleh seorang administrator untuk melayani user/clientnya.
Sunday, April 26, 2015
LAB 6 How To Netinstall in the Mikrotik Routerboard
LAB VI HOW TO NETINSTALL IN THE MIKROTIK ROUTERBOARD

- THE PURPOSE OF THE WRITING :
- TUJUAN PENULISAN :
1. Untuk mengetahui pengertian dari netinstall
2. To know how to configure netinstall in the Mikrotik routerboard
2. Untuk mengetahui cara konfigurasi netinstall pada routerboard Mikrotik
- BASIC CONCEPTS :
- KONSEP DASAR :
- The understanding of netinstall
- Pengertian dari Netinstall
- Pengertian dari Netinstall
Netinstall is a program that runs on a Windows computer that allows you to install RouterOS MikroTik RouterBoard to a PC or to a network via Ethernet. Netinstall also be used to re-install RouterOS in cases where the previous installation failed, became damaged or lost access password.
Netinstall adalah program yang berjalan pada komputer Windows yang memungkinkan Anda untuk menginstal MikroTik RouterOS ke PC atau ke RouterBoard melalui jaringan Ethernet. Netinstall juga digunakan untuk menginstal ulang RouterOS dalam kasus di mana instalasi sebelumnya gagal, menjadi rusak atau password akses hilang.
Netinstall adalah program yang berjalan pada komputer Windows yang memungkinkan Anda untuk menginstal MikroTik RouterOS ke PC atau ke RouterBoard melalui jaringan Ethernet. Netinstall juga digunakan untuk menginstal ulang RouterOS dalam kasus di mana instalasi sebelumnya gagal, menjadi rusak atau password akses hilang.
Saturday, April 25, 2015
LAB 5 Upgrade & Downgrade Version in the Mikrotik Routerboard
LAB V UPGRADE & DOWNGRADE VERSION IN THE MIKROTIK ROUTERBOARD

- THE PURPOSE OF THE WRITING :
- TUJUAN PENULISAN :
1. To know what is the meaning of upgrade and downgrade
1. Untuk mengetahui pengertian dari upgrade dan downgrade
1. Untuk mengetahui pengertian dari upgrade dan downgrade
2. To know how to upgrade a package in the Mikrotik routerboard
2. Untuk mengetahui cara upgrade paket di routerboard Mikrotik
2. Untuk mengetahui cara upgrade paket di routerboard Mikrotik
3. To know how to downgrade a package in the Mikrotik routerboard
3. Untuk mengetahui cara downgrade paket di routerboard Mikrotik
3. Untuk mengetahui cara downgrade paket di routerboard Mikrotik
4. To know how to reset configuration in the Mikrotik routerboard
4. Untuk mengetahui cara mereset konfigurasi di routerboard Mikrotik
4. Untuk mengetahui cara mereset konfigurasi di routerboard Mikrotik
- BASIC CONCEPTS :
- KONSEP DASAR :
- The understanding of upgrade
- Pengertian upgrade
- Pengertian upgrade
Upgrade is a process of renewing things, adding new facilities and capabilities.
Upgrade adalah suatu proses memperbaharui sesuatu, menambahkan fasilitas dan kemampuan yang baru.
- The understanding of downgrade
- Pengertian downgrade
Downgrade is a process to downgrade or performance carried out by certain reasons.
Downgrade adalah suatu proses menurunkan versi ataupun kinerja yang dilakukan dengan alasan tertentu.
LAB 4 Enable, Disable & Uninstall Package in the Mikrotik Routerboard
LAB IV ENABLE, DISABLE & UNINSTALL PACKAGE IN THE MIKROTIK ROUTERBOARD

- THE PURPOSE OF THE WRITING :
- TUJUAN PENULISAN :
1. Untuk mengetahui pengertian dari enable, disable dan uninstall
2. To know how to enable packet on Mikrotik routerboard
2. Untuk mengetahui cara enable packet pada routerboard Mikrotik
3. To know how to disable packet on Mikrotik routerboard
3. Untuk mengetahui cara disable packet pada routerboard Mikrotik
4. To know how to uninstall packet on Mikrotik routerboard
4. Untuk mengetahui cara uninstall packet pada routerboard Mikrotik
- BASIC CONCEPTS :
- KONSEP DASAR :
- The understanding of enable
- Pengertian dari enable
Enable is the command to connect internal or external devices in the configuration settings.
Enabled yaitu perintah untuk menghubungkan perangkat internal maupun eksternal dalam konfigurasi setting.
Enabled yaitu perintah untuk menghubungkan perangkat internal maupun eksternal dalam konfigurasi setting.
- The understanding of disable
- Pengertian dari disable
- Pengertian dari disable
Disable is the command to not connecting the internal or external devices in the configuration settings.
Disabled yaitu perintah untuk tidak menghubungkan perangkat internal maupun eksternal dalam konfigurasi setting.
- The understanding of uninstall
- Pengertian dari uninstall
- Pengertian dari uninstall
Uninstall is the deleting an application, package or program that has been installed on the computer.
Uninstall artinya menghapus sebuah aplikasi, paket atau program yang telah terinstall di komputer.
Uninstall artinya menghapus sebuah aplikasi, paket atau program yang telah terinstall di komputer.
Monday, April 20, 2015
LAB 3 Remote Access To Mikrotik Routerboard
LAB III REMOTE ACCESS TO MIKROTIK ROUTERBOARD

- THE PURPOSE OF THE WRITING :
- TUJUAN PENULISAN :
1. To know what is the meaning of mikrotik routerboard
1. Untuk mengetahui apa itu routerboard mikrotik
2. To know how to change the mikrotik routerboard IP using IP features and new terminal at winbox
2. To know how to change the mikrotik routerboard IP using IP features and new terminal at winbox
2. Untuk mengetahui cara mengganti IP routerboard mikrotik menggunakan fitur IP dan new terminal pada winbox
3. To know how to remotely mikrotik routerboard using webfig in the web browser
3. To know how to remotely mikrotik routerboard using webfig in the web browser
3. Untuk mengetahui cara meremote routerboard mikrotik menggunakan webfig pada web browser
4. To know how to remotely mikrotik routerboard using telnet with CMD on the client
4. To know how to remotely mikrotik routerboard using telnet with CMD on the client
4. Untuk mengetahui cara meremote routerboard mikrotik menggunakan telnet pada CMD client
5. To know how to remotely mikrotik routerboard using SSH with putty program
5. To know how to remotely mikrotik routerboard using SSH with putty program
5. Untuk mengetahui cara meremote routerboard mikrotik menggunakan SSH dengan program putty
6. To know how to remotely mikrotik routerboard using hyperterminal program
6. To know how to remotely mikrotik routerboard using hyperterminal program
6. Untuk mengetahui cara meremote routerboard mikrotik menggunakan program hyperterminal
- BASIC CONCEPTS :
- KONSEP DASAR :
- The understanding of routerboard
- Pengertian dari routerboard
- Pengertian dari routerboard
RouterBoard is a special hardware that is designed to run Mikrotik RouterOS so that it can be a powerful router.
RouterBoard adalah suatu hardware khusus yang didesign untuk menjalankan RouterOS Mikrotik sehingga bisa menjadi sebuah router yang handal.
RouterBoard adalah suatu hardware khusus yang didesign untuk menjalankan RouterOS Mikrotik sehingga bisa menjadi sebuah router yang handal.
- The understanding of Mikrotik routerboard
- Pengertian dari routerboard Mikrotik
Mikrotik RouterBoard is a router which contains RouterOS already installed in a board (such as a computer motherboard). For example, RB750, RB450, RB433, etc.
RouterBoard Mikrotik adalah sebuah router yang didalamnya berisi RouterOS yang sudah di install di dalam sebuah Board (seperti motherboard komputer). misalnya RB750, Rb450, RB433, dll.
- Pengertian dari routerboard Mikrotik
Mikrotik RouterBoard is a router which contains RouterOS already installed in a board (such as a computer motherboard). For example, RB750, RB450, RB433, etc.
RouterBoard Mikrotik adalah sebuah router yang didalamnya berisi RouterOS yang sudah di install di dalam sebuah Board (seperti motherboard komputer). misalnya RB750, Rb450, RB433, dll.
Saturday, April 11, 2015
LAB 2 Installation Mikrotik With GNS3
LAB II INSTALLATION MIKROTIK WITH GNS3

- THE PURPOSE OF THE WRITING :
- TUJUAN PENULISAN :
1. Untuk mengetahui bagaimana cara menginstall Mikrotik
2. To know how to configure at GNS 3
2. Untuk mengetahui bagaimana cara konfigurasi di GNS3
3. To know how to install Mikrotik using qemu
3. Untuk mengetahui bagaimana cara menginstall Mikrotik menggunakan Qemu
- BASIC CONCEPTS :
- KONSEP DASAR :
- Pengertian dari GNS3
GNS3 is a graphical network simulator that allows simulation of complex networks .
GNS3 adalah network simulator grafis yang memungkinkan simulasi jaringan yang kompleks.
- Pengertian dari Qemu
Qemu is an emulator application that relies on binary translation to achieve speed when running on the host computer architecture. In connection with the host computer. Qemu provide a device model that allows to run different operating systems that have not been modified so that it can be displayed in a virtual hosted marchine monitor.
Qemu is an emulator application that relies on binary translation to achieve speed when running on the host computer architecture. In connection with the host computer. Qemu provide a device model that allows to run different operating systems that have not been modified so that it can be displayed in a virtual hosted marchine monitor.
Qemu
adalah sebuah aplikasi emulator yang mengandalkan terjemahan biner
untuk mencapai kecepatan saat berjalan pada arsitektur komputer host.
Sehubungan dengan komputer host. Qemu menyediakan model perangkat yang
memungkinkan untuk menjalankan sistem operasi yang berbeda yang belum
dimodifikasi sehingga dapat ditampilkan dalam host memantau marchine
virtual.
- CONFIGURATION :
- KONFIGURASI :
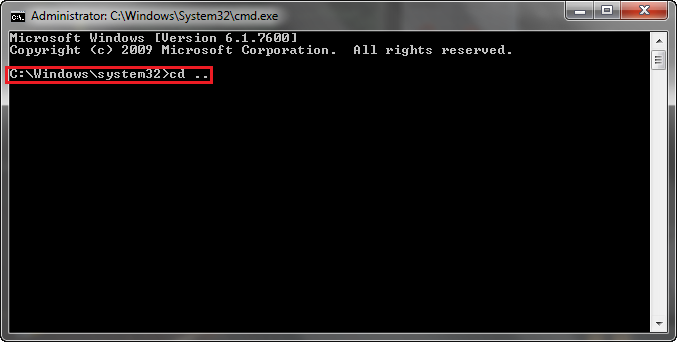
1. First, open CMD as administrator, and then type the command "cd .." to get out of the system 32.
1. Pertama, buka CMD sebagai administrator, kemudian ketik perintah "cd .." untuk keluar dari system 32.
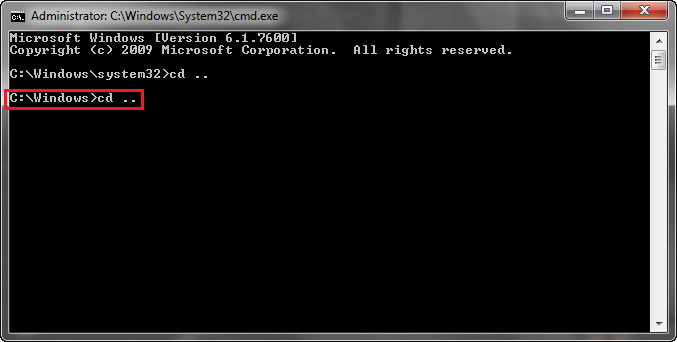
2. Then type the command "cd .." again to get out of the windows.
2. Kemudian ketik perintah "cd .." lagi untuk keluar dari windows.
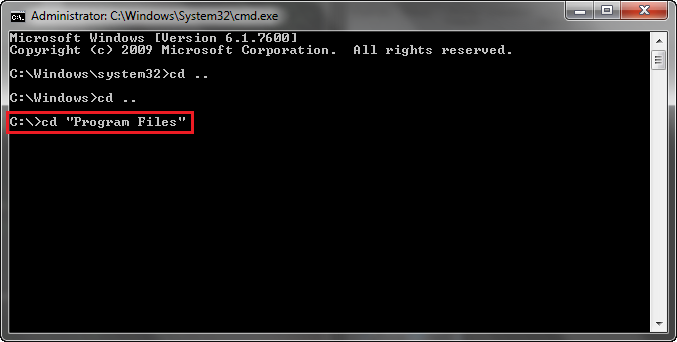
3. After that, typing the command " cd "Program Files" " so we go to the Program Files folder.
3. Setelah itu, ketikan perintah " cd "Program Files" " artinya kita akan menuju ke folder Program Files.
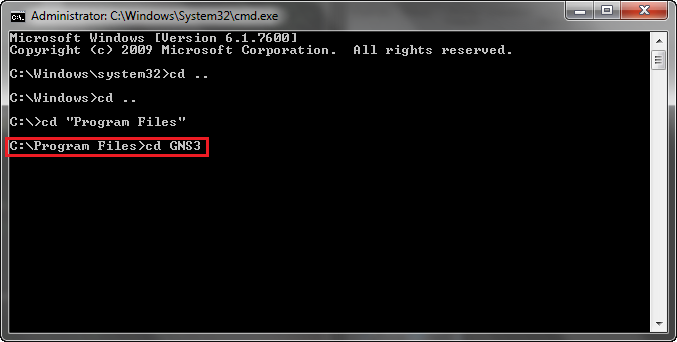
4. Then typing the command "cd GNS3" whose purpose was for us to go to the folder GNS3.
4. Kemudian ketikan perintah "cd GNS3" yang tujuannya adalah kita akan menuju ke folder GNS3.
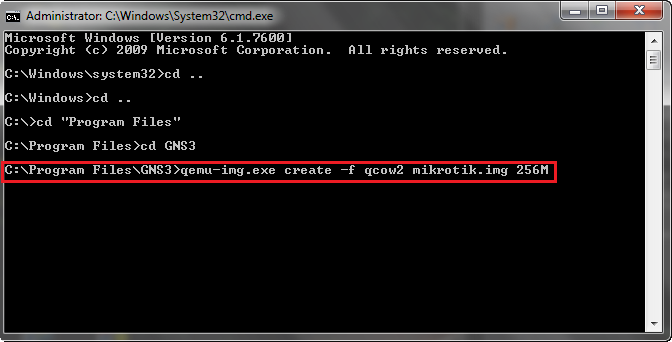
5. Then type the command “qemu-img.exe create –f qcow2 mikrotik.img 256M”.
5. Kemudian ketikan perintah “qemu-img.exe create –f qcow2 mikrotik.img 256M”.
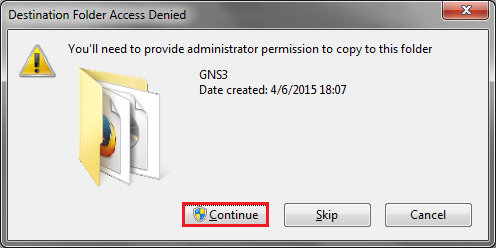
6. After that, copy the Mikrotik ISO to a folder GNS3 , if the following warning appears , select only continue.
6. Setelah itu, copy ISO Mikrotik ke folder GNS3, jika peringatan berikut muncul, pilih saja continue.
7. And then typing the command “ qemu.exe mikrotik.img –boot d –cdrom “Mikrotik.iso” “.
7. Kemudian ketikan perintah " qemu.exe mikrotik.img -boot d -cdrom "Mikrotik.iso" ".
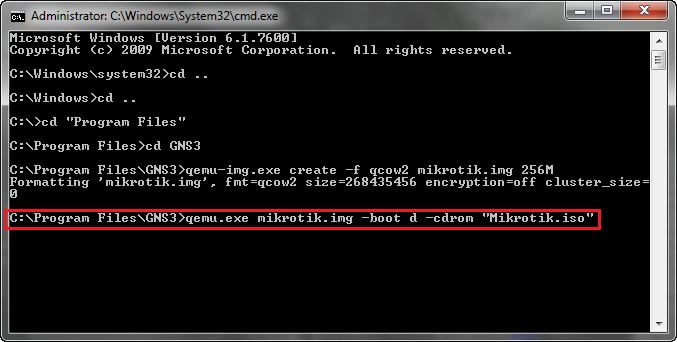
8. After that will appear qemu screen and will run automated processes, waiting until the next step.
8. Setelah itu akan muncul layar qemu dan akan berjalan proses otomatis, tunggu sampai langkah berikutnya.
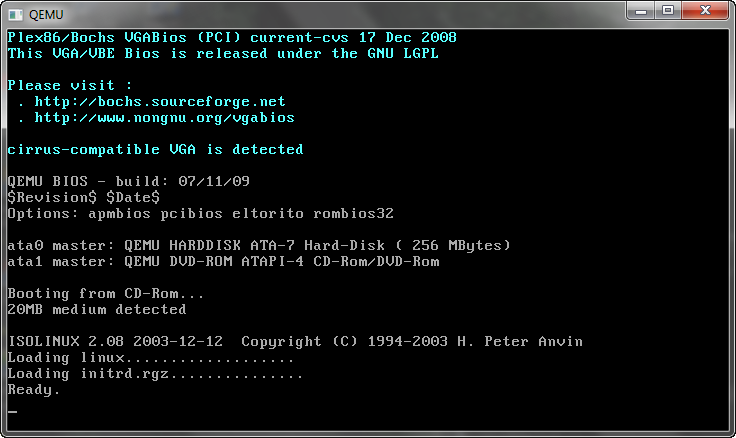
9. Then will come a lot of software to be installed , press " A " if you want to select all , then press the "I " , " Y " , " Y ".
9. Maka akan muncul banyak
software yang akan diinstal, tekan "A" jika Anda ingin memilih semua,
kemudian tekan tombol "I", "Y", "Y".
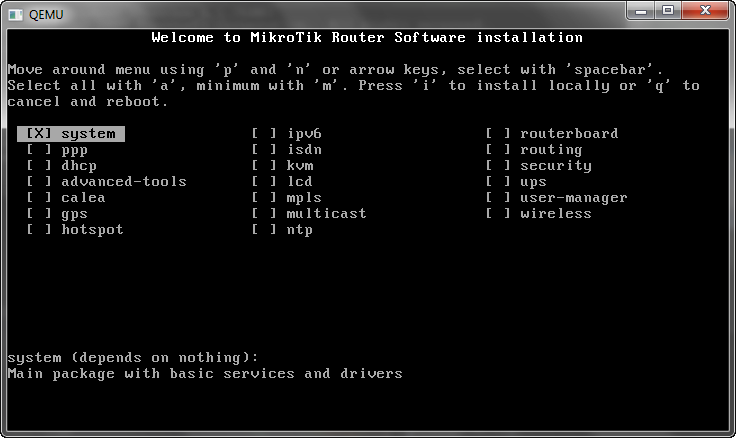
10. And then will run an automatic process , wait until the process is complete.
10. Dan kemudian akan berjalan proses otomatis, tunggu sampai proses tersebut selesai.
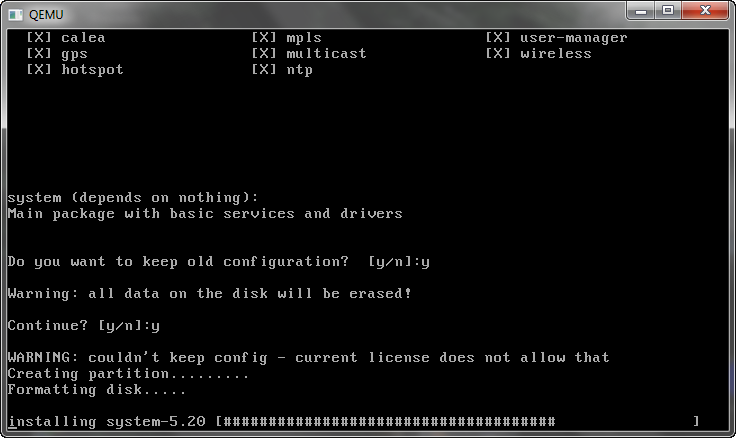
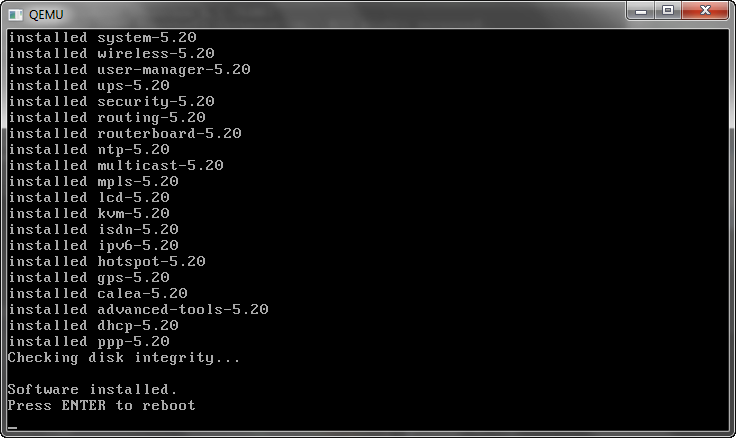
11. After that will be asked to reboot , press enter to reboot, and exit the program.
11. Setelah itu akan diminta untuk reboot, tekan enter untuk reboot, dan keluar dari program.
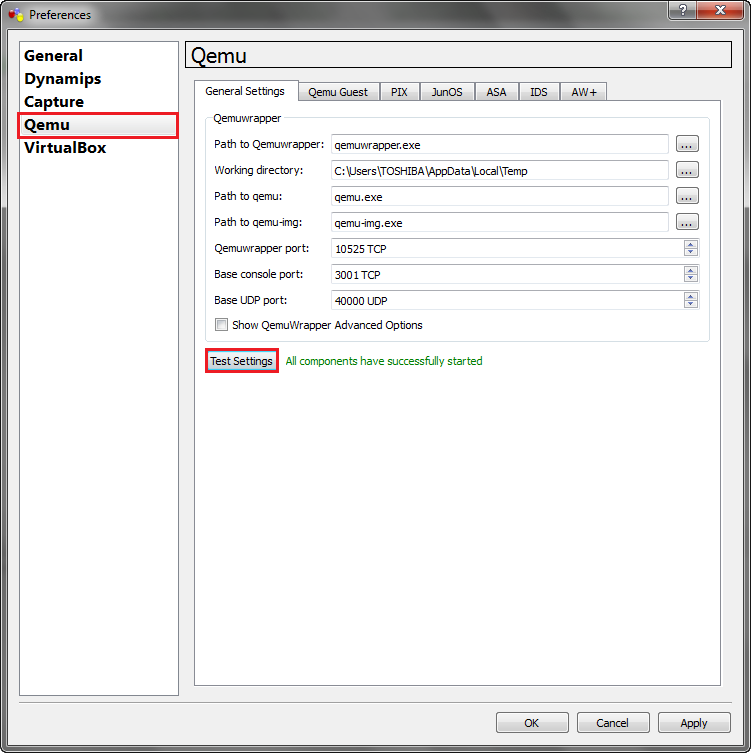
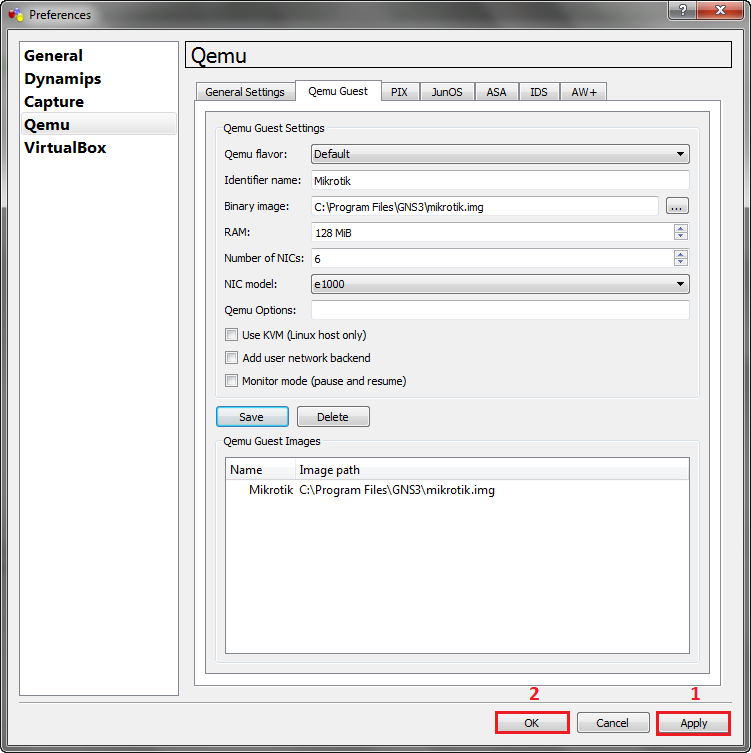
12. Then open GNS3, select Edit > Preferences, then qemu. Perform test settings, If you see a green writing, it means qemu on GNS3 can already be used.
12. Kemudian buka GNS3, pilih
Edit > Preferences, kemudian qemu. Lakukan tes, jika anda melihat
tulisan hijau, itu berarti qemu pada GNS3 sudah dapat digunakan.
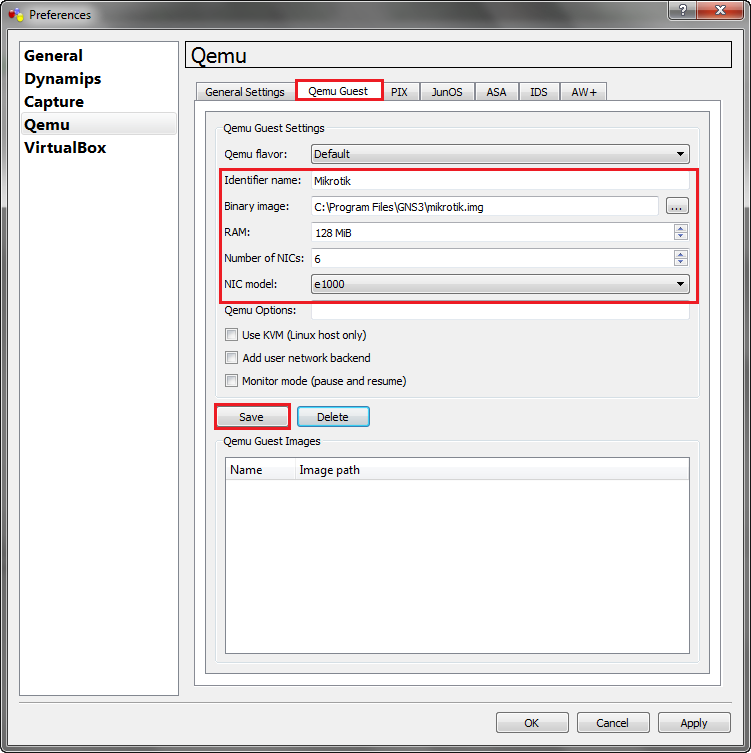
13. After that, click on qemu guest, enter the identifier name, and binary image. Then click save.
13. Setelah itu, klik pada qemu guest, masukkan nama, dan binary image. Kemudian klik save.
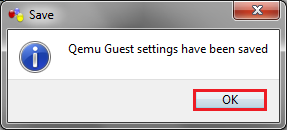
14. It would appear warning that we have managed to do the save data is qemu. Click ok.
14. Akan muncul peringatan bahwa kita telah berhasil melakukan save data qemu. Klik ok.
15. After that, click apply then ok.
15. Setelah itu, klik apply lalu ok.
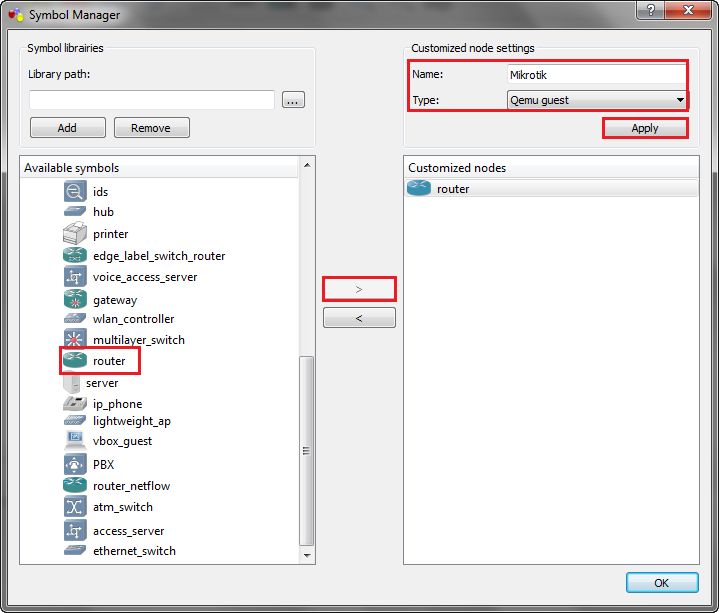
16. Then go to Edit > Symbol manager. Put the router to the list that will be run, change the name and the type of change into qemu guest, and click apply.
16.
Lalu coba masuk ke Edit > Symbol Manager. Masukan router ke daftar
yang akan dijalankan, ubah nama router tersebut dan tipenya menjadi qemu
guest, dan klik apply.
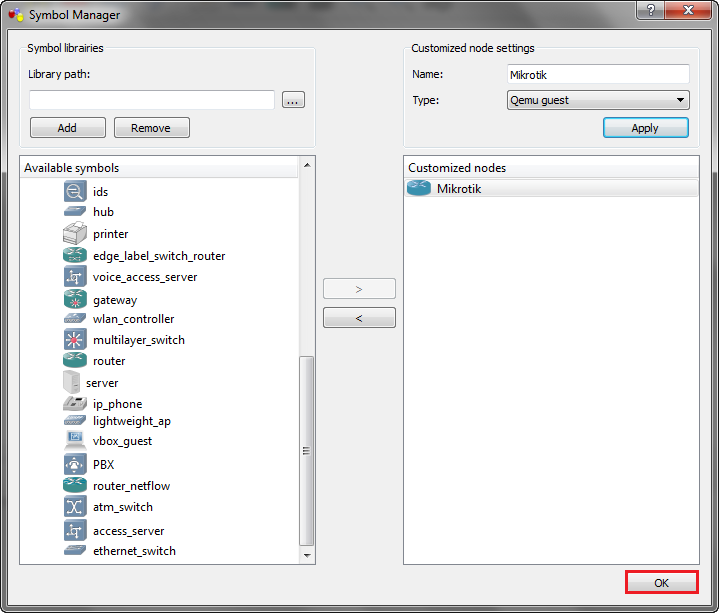
17. After that click ok.
17. Setelah itu klik ok.
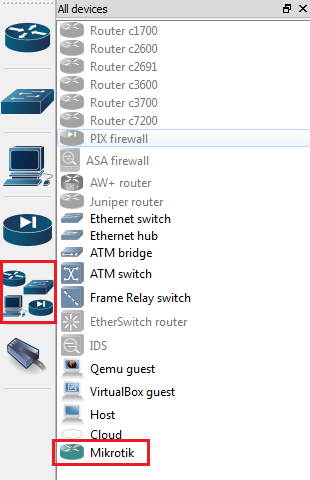
18. Then click on the image that contains the hardware. Then drag image of the router (Mikrotik) to the middle of the screen.
18. Kemudian klik pada gambar yang berisi daftar perangkat keras. Kemudian tarik gambar router (Mikrotik) ke layar tengah.
19. Then after the router (Mikrotik) is already in the middle of the screen, click Start to run.
19. Kemudian setelah router (Mikrotik) sudah di tengah layar, klik Start untuk menjalankan.
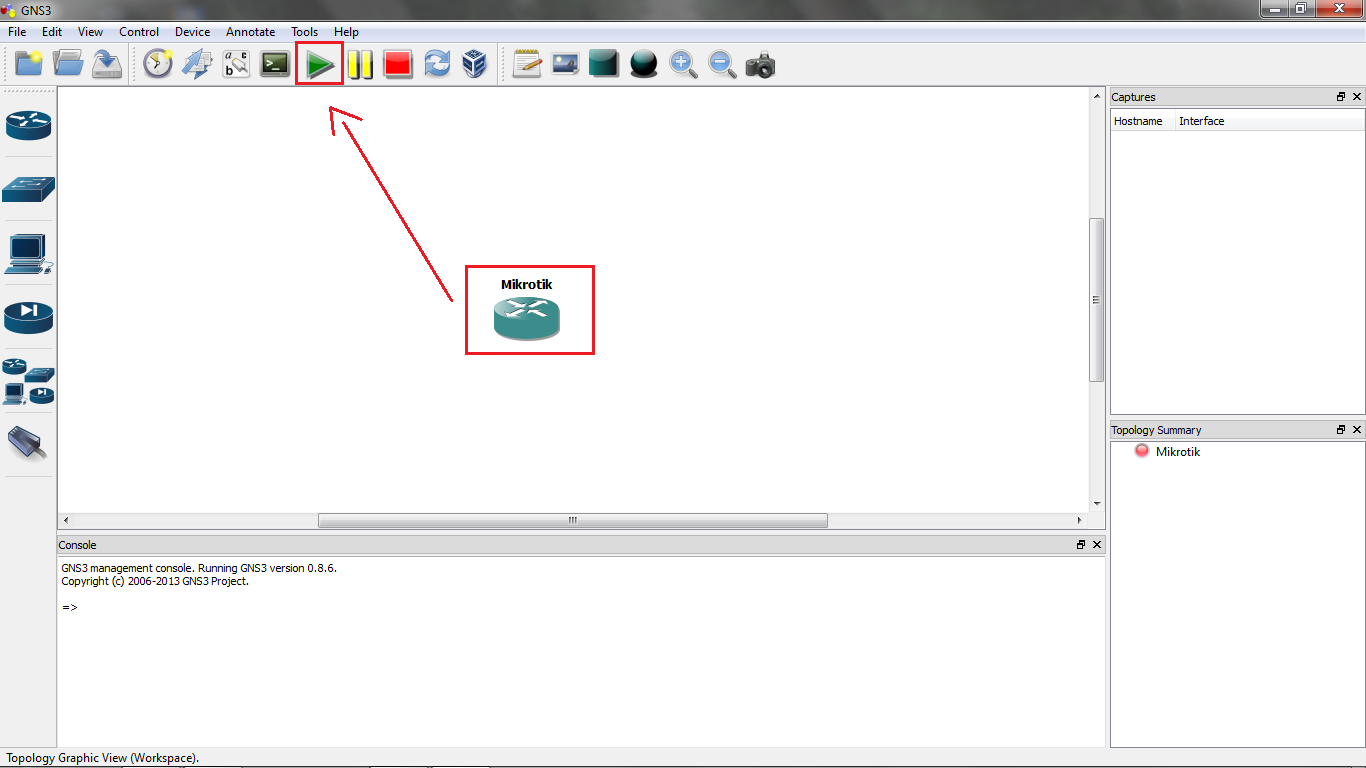
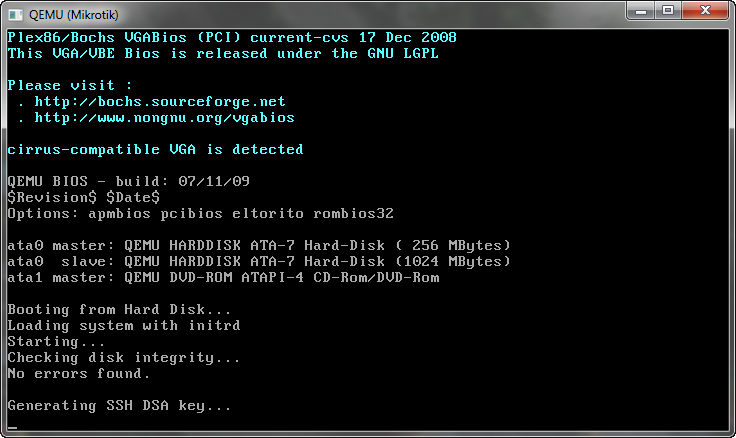
20. Then after clicking start on the router, will run automatically boot of the router.
20. Kemudian setelah mengklik start pada router, akan berjalan secara otomatis booting dari router.
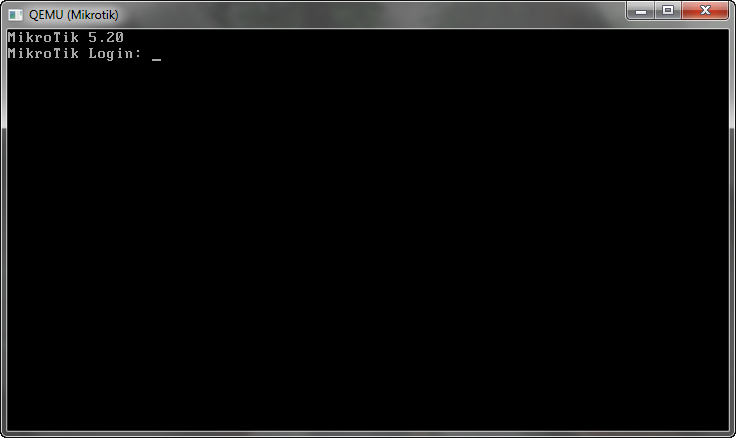
21. This is a screen that asks you to enter a username and password to login, which means you have successfully installed the mikrotik in qemu using GNS3.
21. Ini adalah layar yang
meminta Anda untuk memasukkan username dan password untuk login, yang
berarti Anda telah berhasil menginstal Mikrotik di Qemu menggunakan
GNS3.
LAB 1 Introduce Mikrotik
LAB I INTRODUCE MIKROTIK

- THE PURPOSE OF THE WRITING :
- TUJUAN PENULISAN :
1. Untuk mengetahui apa pengertian dari Mikrotik
2. To Know what is the history of Mikrotik
2. Untuk mengetahui apa sejarah dari Mikrotik
3. To know the features that exist in Mikrotik3. Untuk mengetahui fitur yang terdapat dalam Mikrotik
4. To know type or model of routerboard
4. Untuk mengetahui tipe atau model dari routerboard
- THE MEANING OF MIKROTIK
- PENGERTIAN DARI MIKROTIK
Mikrotik is a brand of a network device, at the first time Mikrotik just a software that is installed in the computer used to control the network, but in its development today has become a device or network device that is reliable and affordable prices, as well as widely used at the level of Internet Service Providers (ISP).
Mikrotik adalah sebuah merek dari sebuah perangkat jaringan, pada awalnya Mikrotik hanyalah sebuah perangkat lunak atau software yang di-install dalam komputer yang digunakan untuk mengontrol jaringan, tetapi dalam perkembangannya saat ini telah menjadi sebuah device atau perangkat jaringan yang andal dan harga yang terjangkau, serta banyak digunakan pada level perusahaan penyedia jasa internet (ISP).
Mikrotik adalah sebuah merek dari sebuah perangkat jaringan, pada awalnya Mikrotik hanyalah sebuah perangkat lunak atau software yang di-install dalam komputer yang digunakan untuk mengontrol jaringan, tetapi dalam perkembangannya saat ini telah menjadi sebuah device atau perangkat jaringan yang andal dan harga yang terjangkau, serta banyak digunakan pada level perusahaan penyedia jasa internet (ISP).
- THE HISTORY OF MIKROTIK
- SEJARAH DARI MIKROTIK
Sejarah Mikrotik pada awalnya dimulai saat dua orang ahli jaringan yaitu John Trully dan Arnis Riekstins berhasil membuat routing jaringan ke jaringan yang lebih luas, sehingga hal ini menjadi visi Mikrotik sampai saat ini, yaitu “Routing the World”.
John Trully an American, but migrated to Latvia, a country that became Russia's neighbors. Together with Arnis Riekstins, native Latvia, they work together to create a device that is really reliable for network routing work.
John Trully berkebangsaan Amerika, tetapi bermigrasi ke Latvia, sebuah negara yang menjadi tetangga Rusia. Bersama dengan Arnis Riekstins, asli Latvia, mereka bekerja sama untuk membuat sebuah perangkat yang benar-benar dapat diandalkan untuk pekerjaan routing jaringan.
It starts with making Mikrotik based Linux kernel, they both build an ISP speed of 2Mbps and named AERONET, in Moldova, a neighboring country Latvia. Only after that they serve 5 customers for the first time in Latvia.
Dimulai dengan membuat Mikrotik yang berbasiskan kernel Linux, mereka berdua membangun sebuah ISP berkecepatan 2Mbps dan bernama Aeronet, di Moldova, sebuah negara tetangga Latvia. Baru setelah itu mereka melayani 5 pelanggan pertamanya di Latvia.
From that’s, Mikrotik operating system was developed, which at the beginning of the vision they want to make a router that is reliable, and can be installed easily on a regular computer and having features and complete facilities.
Dari sinilah sistep operasi Mikrotik dikembangkan, dimana pada awal visi mereka ingin membuat sebuah router yang andal, dan dapat diinstall dengan mudah pada komputer biasa dan memiliki fitur dan fasilitas yang cukup lengkap.
The features available on Mikrotik are as follows :
Fitur-fitur yang tersedia pada Mikrotik diantaranya adalah sebagai berikut :
- Firewall and NAT
- Firewall and NAT
- Firewall and NAT
- Routing - Static Routing
- Routing - Routing Static
- Routing - Routing Static
- Hotspot
- Hotspot
- Hotspot
- Point-to-point tunneling protocols (PPTP)
- Point-to-point tunneling protocols (PPTP)
- Simple tunnels- Simple tunnels
- IPSec
- IPSec
- IPSec
- Web Proxy
- Web Proxy
- DNS client Chaching
- DNS client Chaching
- DNS client Chaching
- DHCP
- DHCP
- DHCP
- Universal Client
- Universal Client
- Universal Client
- VRRP
- VRRP
- VRRP
- UPnP
- UPnP
- UPnP
- NTP
- NTP
- NTP
- Monitoring / Accounting
- Monitoring / Accounting
- SNP
- SNP
- SNP
- M3P
- M3P
- MNDP
- MNDP
- And other network Tools
- Dan alat jaringan lainnya
- Dan alat jaringan lainnya
- THE FUNCTION OF MIKROTIK :
- FUNGSI DARI MIKROTIK :
1. Internet connection settings can be performed centrally and make it easier for management.
1. Pengaturan koneksi internet dapat di lakukan secara terpusat dan dengan manajemen yang sangat mudah
1. Pengaturan koneksi internet dapat di lakukan secara terpusat dan dengan manajemen yang sangat mudah
2. Configure the LAN can be done by simply relying on Mikrotik Router OS PC with the hardware requirements are very low.
2. Konfigurasi LAN dapat dilakukan dengan PC yang telah ada Router OS Mikrotiknya, walaupun spesifikasi PC yang sangat minimum
2. Konfigurasi LAN dapat dilakukan dengan PC yang telah ada Router OS Mikrotiknya, walaupun spesifikasi PC yang sangat minimum
3. Blocking sites can be done by Mikrotik forbidden.
3. Pemblokiran situs terlarang dapat dilakukan oleh Mikrotik
4. Make a PPPoE Server.
4. Make a PPPoE Server.
4. Dapat membuat PPoE server
5. Billing Hotspot.
5. Pembagian hotspot
5. Billing Hotspot.
5. Pembagian hotspot
6. Separate the international and local traffic bandwidth, and other.
6. Memisahkan bandwidth internasional dan lokal, dan lainnya
6. Memisahkan bandwidth internasional dan lokal, dan lainnya
- TYPE OR MODEL OF ROUTERBOARD
- TIPE ATAU MODEL DARI ROUTERBOARD
Sebelum Anda memutuskan untuk membeli RouterBOARD harus kita ketahui terlebih dahulu kode model RouterBOARD tersedia di pasar sehingga kita dapat menentukan perangkat yang cocok untuk kebutuhan kita . Misalkan kita sering membaca di internet itu adalah titik akses yang baik adalah Radio RB433AH , apa sebenarnya tujuan dari kode Model ?

Other codes :
Kode lainnya :
- U : It is equipped with a USB port
- U : Sudah dilengkapi dengan port USB
- A : Advanced ,usually to level 4 and above
- A : Advanced, biasanya untuk level 4 ke atas
- H : High Performance , has a higher processor clock
- H : High Performance, memiliki kemampuan processor yang cukup tinggi
- H : High Performance , has a higher processor clock
- H : High Performance, memiliki kemampuan processor yang cukup tinggi
- R : It is equipped with an embedded wireless card
- R : Sudah dilengkapi dengan wirelless card
- G : It is equipped with Gigabit Ethernet ports
- G : It is equipped with Gigabit Ethernet ports
- G : Sudah dilengkapi dengan port Gigabit Ethernet
Monday, December 15, 2014
Materi Switch Port Security (Violation)

Dalam violation terdapat action yaitu membatasi berapa kali dia boleh
mengganti mac addressnya,violation di bagi menjadi 3 yaitu Violation
Shutdown, Violation Restrict , dan Violation Protect. Kali
ini saya share tentang Violation Shutdown mari kita ke konfignya.
Wednesday, November 26, 2014
Materi Switch (Port Security)
Port Security
Fungsinya :
- Secara Default Port Security dinonaktifkan
- Membatasi jumlah MAC Address yang valid pada port tertentu
- Menentukan grup MAC Address yang valid diizinkan menggunakan port atau mengizinkan hanya satu MAC Address yang diizinkan menggunakan port
- Menentukan bahwa port akan mati secara otomatis jika terdeteksi MAC Address tidak valid

Static Port Security
1. Setting ip addres pada masing2 PC dengan subnet /29.
2. Untuk setting ip pada router lakukan cara berikut ini :
- Router>en
- Router#conf t
- Enter configuration commands, one per line. End with CNTL/Z.
- Router(config)#int fa0/1
- Router(config-if)#ip address x.x.x.x x.x.x.x
4. Lakukan perintah dibawah ini pada switch untuk mengetahui mac address pada setiap pc.
- Switch>en
- Switch#show mac-address-table
6. Untuk membuat static port security lakukan perintah dibawah ini.
- Switch>en
- Switch#conf t
- Enter configuration commands, one per line. End with CNTL/Z.
- Switch(config)#int fa0/1
- Switch(config-if)#switchport mode access
- Switch(config-if)#switchport port-security
- Switch(config-if)#switchport port-security mac-address xxxx.xxxx.xxxx
8. Untuk mengetahui hasil dari konfigurasi yang dibuat bisa menggunakan perintah:
- Switch#sh port-security int fa0/1
- Switch#sh port-security address
Video tutorial static port security :
Link youtube : https://www.youtube.com/watch?v=0obI-e8fNcI
Sticky Port Security

2. Lalu atur juga IP pada PC 2.


4. Lalu atur juga IP pada PC 4.

5. Ketikan sintaks/perintah konfigurasi sticky mac-address. Lakukan kepada interface 0/1 sampai 0/5.

6. Lalu coba cek mac-address table nya. Hanya akan terlihat interface 0/1 saja.

7. Coba lakukan PING kepada semua PC agar bisa kita lihat keseluruhan mac-address yang nantinya akan kita lihat port-security mac-address.

8. Lalu ketikan perintah ‘show port-security address’. Lalu akan terlihat table mac-address sticky nya.

SEKIAN
TERIMA KASIH :)
Subscribe to:
Posts
(
Atom
)


